The end of the project is at hand, and we're currently editing the shots in Adobe Premiere Pro CS4!
One of the scenes in the movie has been modelled, animated, and rendered by my co-student,
Kim Fodnestøl, with me as a voiceactor. (Yes, I know it's supposed to be a womans voice...)
Upon recieving the rendered files there are some small inconsistencies with the already recorded voices, and in of the shots AvaCado reacts a bit too fast which makes the shot less believable, although we're dealing with an immortal, sociopathic demon here!
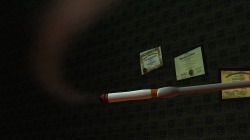
Original shot:
The rendered files were supposed to contain no lip-synching as we were supposed to do the multi-layered voices from a pretty early point in the production. The shot were Edgar the demon seems bored, appears to be identical, which I also didn't like too much.
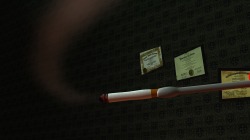
Here, in the recreated shot I added a foley sound of my own fingers cracking instead of the twig breaking in the old shot. The frame where Edgar seems bored has a few frozen frames to mimic him holding his eyes shut. I also added a few extra frames where AvaCado would try to look at Edgar, then looking down on her meal then react to him going demonic over his meal. Also adding the echo durring the fadetoblack seemed like a nice touch!
Recreated shot:
After struggeling with creating smoother shadows for my movie project, I compiled an easy way to do the whole deal in post.
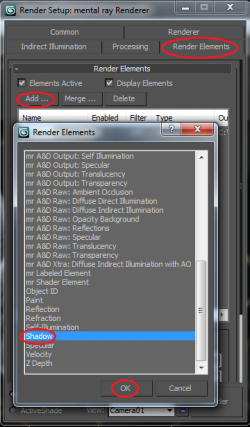
In your scene, hit F10 and click 'Render Elements'. Then 'Add...' then fetch the 'Shadow' element and hit OK.
When you render out your sequence now, you will get an extra frame where only the scene shadows are visible.

Now, open up Premiere and import both sequences. To get this to work, the Shadow-sequence will have to be colored white instead of black, so add the effect 'Invert'.
Also, since I rendered out the sequence in .tga, I will have to add black background. (Currently there simply is no background in sequence, but it is represented in black nothingness.)
Create a new sequence, and insert the shadow+black-video sequence into it.
Now put the main render on top of the shadow+black-video sequence and add a Compound Blur to the main render. Change the Blur Layer so it uses the shadow+black-video sequence to blur the shadows.
You should end up with something like this:
Good luck!

So sitting at school alone, 2 AM a Friday night, one could get really lonely, but I have the perfect cure for this!
I guess my cure isn't for the masses, but it works great for me.
Some would simply listen to music, but I have a friend on YouTube called vash12349!
One of the great things he does is playing through old and new games, records it and comments all along the way. During one of my old school projects I sat through watching him complete MGS4 with cutscenes, which was about 9 hours of listening to this guy bashing anything and everyone inside the game. The fact that he is about my age and got aproximately the same taste for games as I do, we get along well, although I pretty much just listen to him all night.
I must warn you, there is no profanity filter on YouTube, luckilly, as this guy makes your funnybone tickle several times a minute, and seeing him play through a game you've played yourself, you won't really have to pay much attention to the video, giving you the much needed concentration for your 3D scene.
So, during your next project, sleep a couple of extra hours the night before, bring coffee and youtube, and you are ready for a nice all-nighter with vash12349!
One of my all-time favourite games for Nintendo64, played through by Youtube comedian vash12349. Enjoy! Please check out his other walkthroughs aswell, as he
The final render of a scene is often the one taking the longest time to complete. Your particle systems will always be pushed to the max, you need to render out all your objects at once, and don't get me started on the number of Turbosmooth iterations you can use.
However, when it is possible, you should always try to lower your rendertime to complete the project before the deadline.
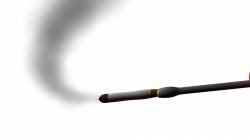
In this scene there aren't that many objects, but the one thing that takes alot of time to render out is the texture applied to the wall in the back.
Rendering out this scene with all the objects in it will take 12min 43sec. Yes, a single frame!
With all the frames, this would take 11 days 13 hourse and 41 seconds to render out, so I had to take some measures!
I tried to blur the texture of the wall in the back which shortened the rendertime by 1min 21sec. which in the long run means 1 day 5 hours 24 minutes and 27 seconds less rendertime, but then I found the perfect way to do it!
All the shots in this scene is taken with a static camera, that never moves, so I layered all the objects in the scene into passive objects, and active objects. Then with every shot I rendered a single shot of the passive objects, then render out the animation of the active objects. This saves an incredible amount of time for every frame!
Putting the active renderpictures over the passive renderpictures is a simple task, since I rendered out the acitve renderpictures as .png files, allowing full see-through effect of parts of the shots that aren't there, this even works through the smoke in the scene.
You can compare it yourself, I hardly see the difference!
1st attempt with all objects in the same render:
12min 43sec.
2nd attempt with blurring the texture of the wall in the back:
11min 22sec.
3rd attempt with pre-rendering passive objects:
4min 39sec!
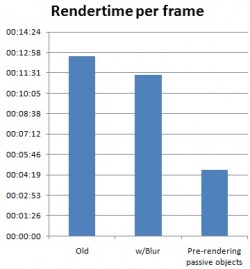
This just to show the difference in the rendertime for each frame, the last attempt bringing the rendertime down to 1/3 of the first.
In a shot where the camera is animated, this technique is useless, since you obviously would be requiredbut with the static camera style we're doing in this scene, it works great!
 RSS Feed